Ever wondered why Netflix remains responsive during a new season launch when millions of concurrent users stream content simultaneously? Or how Amazon sustains peak performance during Black Friday traffic spikes without system failures? The answer lies in a scalable microservices architecture, where applications are decomposed into loosely coupled, independently deployable services.
Each service can scale horizontally based on demand, communicate through lightweight APIs, and operate within isolated failure domains. This architectural approach enables fault tolerance, elastic scalability, continuous deployment, and high system resilience—making it a cornerstone of modern cloud-native application design.
Here’s the thing: if you’re still building monolithic applications in 2026, you’re essentially trying to fit an elephant into a Mini Cooper. It might work for a while, but scaling becomes a nightmare. And let’s be honest, nobody wants to be the engineer explaining to stakeholders why the entire application went down because one module failed.
By the end of this guide, you’ll understand exactly how to design a scalable microservices architecture from scratch. You’ll learn the step-by-step process, understand the critical design patterns, and grasp why companies like Uber, Spotify, and Twitter migrated from monoliths to microservices.
Moreover, you’ll discover practical strategies that you can implement in your own projects—whether you’re working on a college assignment or architecting systems for a production environment.
Ready to dive in? Let’s break down this seemingly complex topic into digestible, actionable steps.
Understanding the Foundation: What Makes Microservices Scalable?
Before we jump into the “how,” let’s quickly establish the “why.” A scalable microservices architecture isn’t just about splitting your application into smaller services. It’s about creating independent, deployable units that can scale horizontally without affecting other parts of your system.
Think of it like a restaurant chain. Instead of having one massive kitchen handling everything (monolith), you have specialized stations—one for appetizers, one for main courses, one for desserts. If there’s suddenly high demand for desserts, you simply add more dessert chefs without disrupting the entire kitchen. That’s microservices in a nutshell.
The key characteristics that make microservices scalable include loose coupling, independent deployment, fault isolation, and technology diversity. Because each service operates independently, you can scale specific components based on demand rather than scaling the entire application.
Step 1: Identify and Define Service Boundaries
The first mistake most developers make is breaking down services too granularly. Remember, the goal isn’t to create a thousand tiny services—it’s to create meaningful business capabilities that can function independently.
Start by analysing your application through the lens of Domain-Driven Design (DDD). Let’s say you’re building an e-commerce platform similar to Amazon. Your core domains might include:
- User Management Service: Handles authentication, authorisation, and user profiles
- Product Catalog Service: Manages product listings, search, and recommendations
- Order Service: Processes orders, manages cart functionality
- Payment Service: Handles payment processing and transactions
- Inventory Service: Tracks stock levels and availability
- Notification Service: Sends emails, SMS, and push notifications
Notice how each service represents a distinct business capability? That’s crucial. Each service should answer the question: “If this service goes down, what specific business functionality becomes unavailable?”
Moreover, apply the Single Responsibility Principle at the service level. Your Order Service shouldn’t be handling payment processing—that’s the Payment Service’s job. This separation ensures that when you need to scale order processing during a flash sale, you’re not also unnecessarily scaling payment processing resources.
Step 2: Design for Inter-Service Communication
Once you’ve defined your services, the next challenge is making them talk to each other effectively. This is where many architectures become bottlenecks because communication patterns directly impact scalability.
You have two primary communication patterns:
Synchronous Communication (REST/gRPC): This works like a phone call—one service directly calls another and waits for a response. It’s great for operations requiring immediate feedback. For instance, when a user checks out, your Order Service might synchronously call the Inventory Service to verify stock availability.
However, synchronous calls create tight coupling and can cascade failures. If the Inventory Service is slow, your Order Service waits, potentially timing out and degrading user experience.
Asynchronous Communication (Message Queues): This works like email—you send a message and continue with your work. The recipient processes it when ready. Tools like RabbitMQ, Apache Kafka, or AWS SQS enable this pattern.
Here’s a practical example: After a user places an order, your Order Service publishes an “OrderCreated” event to a message queue. The Inventory Service subscribes to this event and updates stock levels independently. The Notification Service also subscribes and sends a confirmation email. Neither operation blocks the order placement flow.
The beauty of asynchronous communication is that each service scales independently based on its processing capacity. If your Notification Service is slow, it doesn’t impact order placement—it just processes notifications at its own pace.
Step 3: Implement an API Gateway Pattern
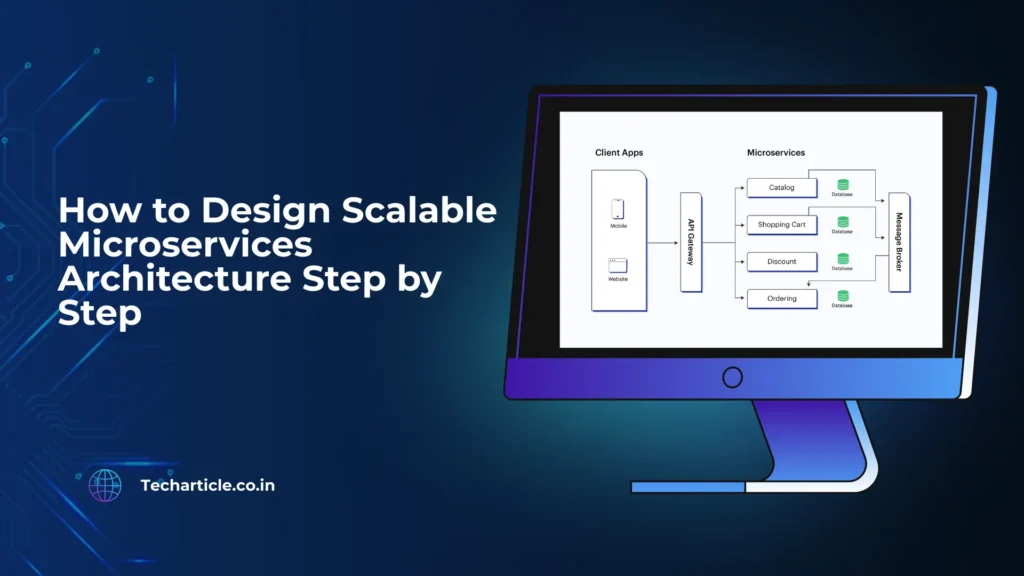
Imagine if your frontend application had to know the exact address of every microservice and call them individually. That’s chaos. This is where an API Gateway becomes your single entry point—think of it as a reception desk directing visitors to the right department.
The API Gateway handles several critical responsibilities:
- Request Routing: It receives all client requests and routes them to the appropriate microservices. When a mobile app requests a product list, the gateway knows to forward this to the Product Catalog Service.
- Authentication and Authorization: Instead of each microservice implementing its own security, the gateway validates JWT tokens and user permissions centrally. This reduces redundancy and potential security gaps.
- Rate Limiting and Throttling: To prevent system abuse and ensure fair resource usage, the gateway can limit how many requests a user makes per minute. During Black Friday sales, this prevents a few users from consuming all resources.
- Response Aggregation: Sometimes clients need data from multiple services. The gateway can call multiple microservices and combine responses into a single payload, reducing round-trip.
Popular API Gateway solutions include Kong, Amazon API Gateway, and Nginx. Choose based on your cloud provider and specific requirements.
Step 4: Implement Service Discovery and Load Balancing
In a scalable microservices architecture, services come and go dynamically. You might have three instances of your Product Service during normal hours, but scale to fifteen during peak traffic. How does the Order Service know where these instances are?
Enter Service Discovery—a mechanism that maintains a registry of all available service instances. Think of it as a phone directory that updates in real-time.
- Client-Side Discovery: The calling service queries the service registry (like Consul or Eureka) to get available instances and chooses one. Netflix’s Eureka is a popular choice here.
- Server-Side Discovery: The calling service makes a request to a load balancer, which queries the registry and forwards the request. Kubernetes does this natively through its Service abstraction.
Load balancing ensures requests are distributed evenly across instances. Algorithms like round-robin, least connections, or weighted distribution prevent any single instance from becoming overwhelmed. Moreover, health checks automatically remove unhealthy instances from the rotation, improving system reliability.
Step 5: Design for Data Management and Database Strategy
Here’s where things get interesting—and controversial. In monolithic applications, you typically have one database. In microservices, the Database-per-Service pattern is recommended because it ensures true service independence.
Let’s revisit our e-commerce example. The User Service might use PostgreSQL for relational user data. The Product Catalog Service might use MongoDB for flexible product attributes. The Notification Service might use Redis for fast access to notification preferences.
This independence means the Product team can optimize their database schema without coordinating with other teams. However, this creates a challenge: What about transactions spanning multiple services?
Saga Pattern is your solution. Instead of traditional ACID transactions, you implement a sequence of local transactions. If one fails, you execute compensating transactions to rollback changes.
Example: When processing an order:
- Order Service creates an order (local transaction)
- Payment Service processes payment (local transaction)
- Inventory Service reserves items (local transaction)
If payment fails, the Order Service executes a compensating transaction to cancel the order. Although this seems complex initially, it’s essential for maintaining service autonomy while ensuring data consistency.
Step 6: Implement Observability and Monitoring
You can’t scale what you can’t measure. In a distributed system with dozens of services, understanding what’s happening becomes exponentially harder. This is why observability isn’t optional—it’s fundamental.
- Distributed Tracing: Tools like Jaeger or Zipkin track requests as they flow through services. When a user complains about slow checkout, you can trace the request and identify that the Payment Service is the bottleneck—not the Order Service.
- Centralized Logging: Services should send logs to a central system like ELK Stack (Elasticsearch, Logstash, Kibana) or Splunk. When debugging issues, you can correlate logs across services based on request IDs.
- Metrics and Alerting: Prometheus and Grafana are excellent for collecting and visualizing metrics. Track service-specific metrics like request latency, error rates, and throughput. Set up alerts when error rates spike or response times degrade.
Health checks at each service ensure your orchestration platform knows when to restart failed instances. Moreover, implement circuit breakers using libraries like Resilience4j or Netflix Hystrix to prevent cascading failures when dependent services are down.
Step 7: Embrace Containerization and Orchestration
Modern scalable microservices architecture relies heavily on containers because they provide consistent environments from development to production. Docker has become the de facto standard for containerization.
Each microservice gets its own container with all dependencies packaged. This solves the classic “it works on my machine” problem. However, managing hundreds of containers manually is impossible—that’s where orchestration platforms come in.
Kubernetes is the industry standard for container orchestration. It automatically handles deployment, scaling, and management of containerized applications. When traffic spikes, Kubernetes can automatically spin up additional pods based on CPU usage or custom metrics. When traffic decreases, it scales down to save resources.
Key Kubernetes concepts for scalability include:
- Horizontal Pod Autoscaling: Automatically adjusts the number of pod replicas based on observed metrics
- Resource Limits: Prevents any single service from consuming all cluster resources
- Rolling Updates: Deploys new versions without downtime by gradually replacing old instances.
- Self-Healing: Automatically restarts failed containers and replaces unhealthy nodes
Step 8: Implement Caching Strategies
Scalability isn’t just about handling more requests—it’s about handling them efficiently. Caching dramatically reduces database load and improves response times.
Implement caching at multiple levels:
- Client-Side Caching: Use HTTP cache headers to let browsers cache static content.
- API Gateway Caching: Cache frequently requested responses at the gateway level.
- Application-Level Caching: Use Redis or Memcached to cache database query results
For our e-commerce example, product details rarely change, so caching them for 5-10 minutes can reduce database queries by 80%. However, be careful with cache invalidation—stale cache is worse than no cache because it serves incorrect data.
Putting It All Together
Designing a scalable microservices architecture is not about implementing all these patterns simultaneously. Start small, perhaps by breaking off one service from your monolith. Implement the patterns that solve your immediate problems, then gradually adopt others as your system evolves.
Remember, companies like Amazon didn’t build their entire microservices architecture overnight. They evolved iteratively, learning from failures and successes along the way. Your journey will be similar—embrace it.
The key is understanding that scalability is a continuous process, not a destination. As your user base grows and requirements evolve, your architecture must adapt. The patterns and strategies outlined here provide a solid foundation, but real mastery comes from hands-on experience, monitoring production systems, and learning from incidents.
Start experimenting with these concepts in your projects today. Build that side project using microservices. Break down that college assignment into independent services. The practical experience you gain will be invaluable because theoretical knowledge only takes you so far—implementation experience is what truly sets exceptional engineers apart.